by Ann at Go West Gardener | Updated: Jan 15, 2024 | Flower Garden Basics
When you buy a flower plant…
You may notice a strange phrase on the plant tag that says: “Hardiness zones” or “Zones.”
If you’re wondering, “What is a plant hardiness zone? What does that mean?”, you’re in the right place.

At its most basic, a plant hardiness zone tells you whether a plant is likely to survive the winter temperatures in your area.
It’s a helpful concept to understand because it can play a role in whether your plants will come back or not.
I like to think of a hardiness zone like a jean size
Think, for a moment, about your favorite pair of jeans.

When you put them on, they fit you like a glove. They feel good. They make you look good. They make your butt look good.
YOU. LOVE. THEM.
Sure, you could wear a size or two bigger, but they just wouldn’t feel right.
And yes, it’s possible you may be able to s-q-u-e-e-z-e into jeans one size smaller — with the help of some serious Spanx or extra reps at the gym. But your jeans REALLY wouldn’t feel right. You wouldn’t last very long in them.
Nope, there’s a sweet spot.
Your favorite jeans are the right size for you.
Your garden is like your beloved pair of denims: It has a sweet spot too
It’s “size” is known as its hardiness zone.
And that zone number tells you which plants should be the right fit for surviving winter temperatures and returning in your garden next year.
You can try planting flowers that don’t fit your garden’s plant hardiness zone, but they’re less likely to return.
Luckily, you don’t have to become a meteorologist to figure out your zone

The U.S. Department of Agriculture (USDA) created a simple way to help you choose plants for your garden.
It’s called the “USDA Plant Hardiness Zone Map.”
Basically, they’ve assigned a zone to where you live. Your zone is based on the coldest temperatures that are expected in your area.
As long as you choose plants that match your zone, your plants should be strong enough to survive winter temperatures in your area.
The opportune word here is “should.” Hardiness zones are based on the expected coldest temperatures in your area. However, Mama Nature has been known to push the boundaries of coldest temps — like the arctic blast that swept much of the U.S. in February 2021. Plus, there are other factors that can come into play on whether your plants survive winter in the West. The key takeaway? While plant hardiness zones are helpful, they aren’t perfect.
Let’s look at the USDA Plant Hardiness Zone Map

You may notice that the coastlines (in oranges and yellows) tend to have warmer winters than the upper-central portion of the United States (in greens, blues and purples).
That’s because the oceans help moderate winter temperatures.
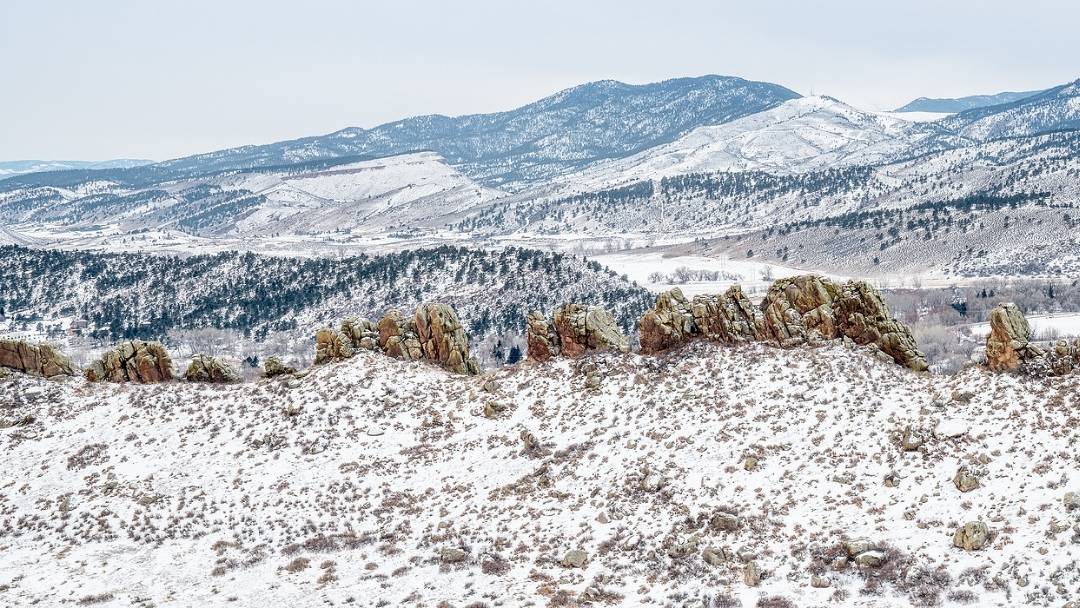
In the Rocky Mountain region of the country, we have a WIDE range of plant hardiness zones. It depends on where you live.
For example, let’s say you live in the Front Range of Colorado. Most areas along the Front Range are in Zone 5. The lowest extreme temperatures you’re expected to get are -10 degrees to -20 degrees Fahrenheit below zero.

You can find your plant hardiness zone on the USDA website
Okay, you’ve looked up your zone number…
Now what the heck are you supposed to do with it?
When you go to buy flowers, look for the zones on the plant tags (tucked in the containers).
If you want your plants to come back next year, pick flowers that match YOUR zone number.
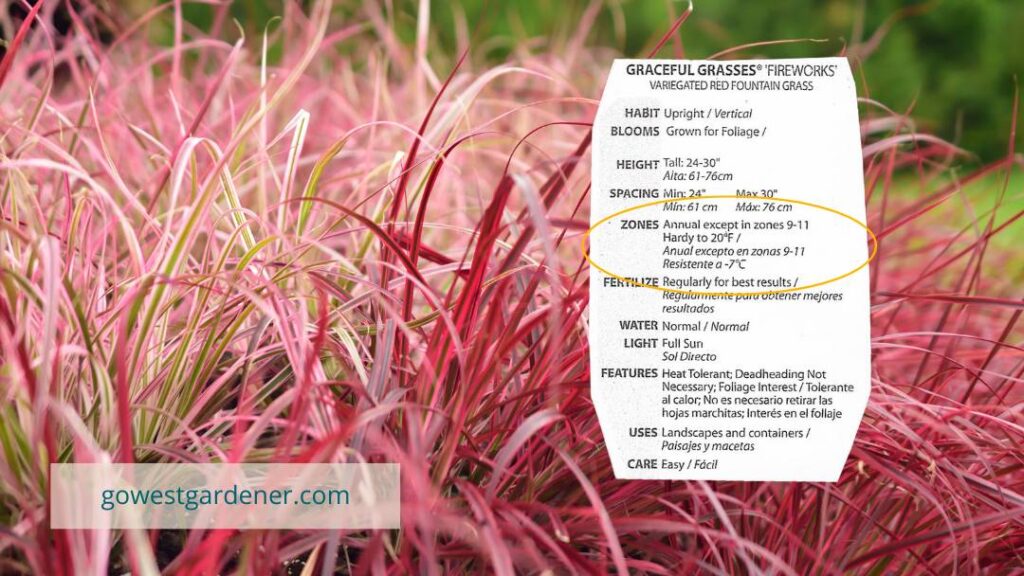
For example, let’s say you live in Zone 5
You see this red fountain grass (below) at the store, and you’d love to plant it in your garden. The plant tag says it’s “annual except in zones 9-11.”
This plant tag is telling you that this grass will likely only survive winter temperatures in Zones 9-11.
Because you are in Zone 5, this plant will look great in your garden for one summer, but it should NOT come back next year. It isn’t “cold hardy” where you live.
Let’s look at another example
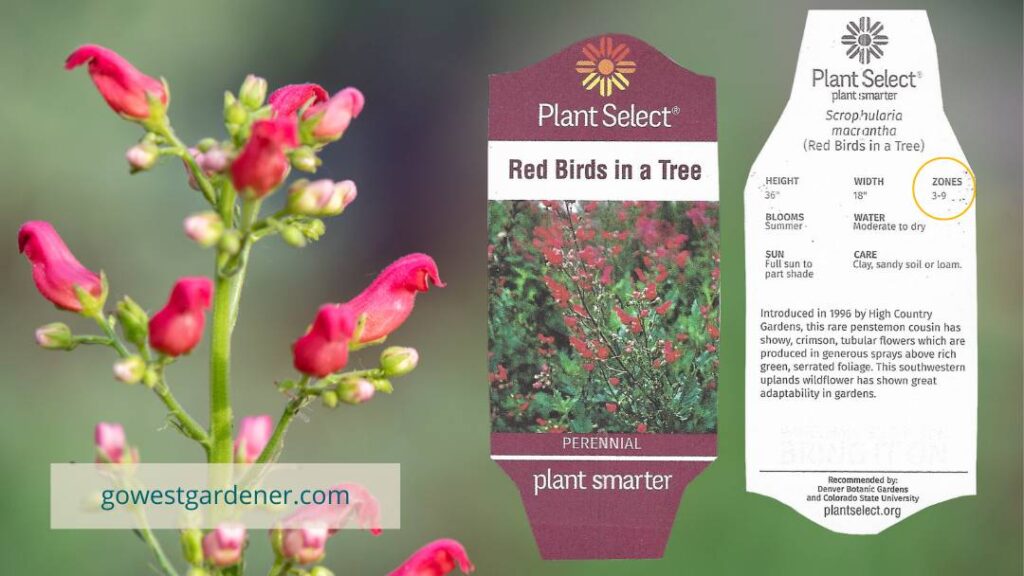
You like the look of the plant below called Red Birds in a Tree. (By the way, this is one of my favorite plants in my garden. My neighbors always ask about it, and the hummingbirds LOVE it!)
The plant tag for this flower says, “Zones 3-9.” Do you see the zones below?
In our example, your garden is in Zone 5, so this plant SHOULD return next year. It should come back in any of the Zones 3-9.
Use your zone to be a smarter plant shopper
When you buy plants that you want to return every year:
- Don’t assume that the plants at the store are right for where you live.
- Check the plant tags to make sure their plant hardiness zones match yours.
- If you’re buying plants online, look for each plant’s hardiness zone in the online description of the plant.
If you pick a plant that doesn’t match your zone, you may find yourself a replacing dead plant next year!
While your plant hardiness zone is helpful, it’s only ONE part of choosing the right flowers for your western garden
Remember that your plant hardiness zone is like your jean size.
When you’re buying jeans, the size is important, yes.
But you probably care about other things too — like the the length, fit and color.
If you’re 5’3′, tall jeans are going to create unnecessary work for you.
And we do not want unnecessary work!
In your western garden, you also want to know:
- How much water your plants need (can they tolerate semi-arid conditions and drought?)
- How well your plants can handle intense sunlight (at elevation, we’re closer to the sun, so our sunlight is tougher on plants)
- Your plants’ tolerance to things like hail and wind
- What kind of soil the plants like
- And more
Here’s an example of what can happen if you only think about your plant hardiness zone.
Again, let’s say you live in Zone 5.
If you ONLY consider your plant hardiness zone when choosing flowers, you may find yourself planting the same flowers that thrive in humid, rainy, coastal Maine.

Not the best idea for your semi-arid garden in Colorado or Utah, right?
It’s helpful to choose flower plants that fit your zone, but know that your zone is only one part of finding the best flowers for your western garden.
Related tips that may interest you:

by Ann at Go West Gardener | Updated: Mar 7, 2025 | Best Flowers for Colorado, Utah & Similar States, Waterwise Gardening in the Intermountain West
Looking for waterwise plants? You don’t have to plant cacti or turn your yard into a desert! There are lots of beautiful, low water plants for Colorado, Utah, Idaho and the semi-arid West. They just may not be the flowers and shrubs you know from other regions of the country.
If you’d like to learn about waterwise plants for Colorado or a similar western state, here are 7 of my fave websites + books. All of these resources have photos of waterwise plants, so it’s easier to picture what the plants will look like.
PlantSelect.org

Image credit: PlantSelect.org | Find a Plant page
Plant Select tests and introduces waterwise plants inspired by the Rocky Mountain region. They’re a non-profit collaboration between Colorado State University, Denver Botanic Gardens and the western green industry.
Their website has several helpful tools. One is a Plant Finder tool (above). You can search for waterwise plants based on various criteria, including how big the plants will get. On other web pages, you can look up where plants are from (their native origins) and how much irrigation they need, if any.
This is a good website to dig into!
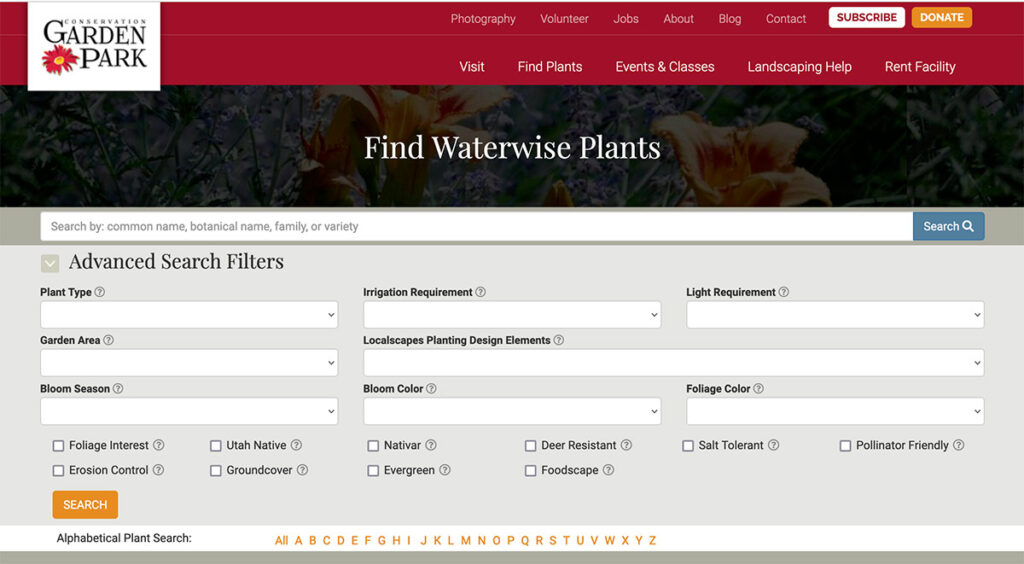
ConservationGardenPark.org

Image credit: ConservationGardenPark.org | Find Waterwise Plants page
Conservation Garden Park is a waterwise demonstration park in northern Utah. Utah residents can visit it to see examples of beautiful landscapes that are low maintenance and low water. And yay for us, Conservation Garden Park has created a big database that showcases the plants in their landscapes.
Utah faces many of the same gardening challenges we have in Colorado: heat, low moisture, tricky soils, etc. This is a great website to explore if you want to learn about waterwise plants.
One of my favorite things about this website is that they include photos of the plants through all the seasons—not just summer. This can be helpful if you want your yard to look good in the fall, winter and spring too!
WaterwisePlants.org

Image credit: Colorado Springs Utilities (WaterwisePlants.org) | Find a Plant page
Colorado Springs Utilities has created waterwise demonstration landscapes that are open to the public. Similar to Conservation Garden Park above, they have a website that showcases the plants in their demonstration landscapes. You can search for waterwise plants using different criteria. Here are a few of their website features I find helpful:
- You can search for plants by height. I like this feature when looking for shrubs. It’s a good way to make sure you aren’t picking a plant that will outgrow your space.
- They have “performance” notes for each plant. Be sure to look at those! They contain practical tips. For example, I was looking at a native grass called Prairie Dropseed. They noted that Prairie Dropseed has performed very well in their landscapes. However, it’s a favorite among rabbits. So, if you have rabbits, plan accordingly or skip this grass. (Helpful!)
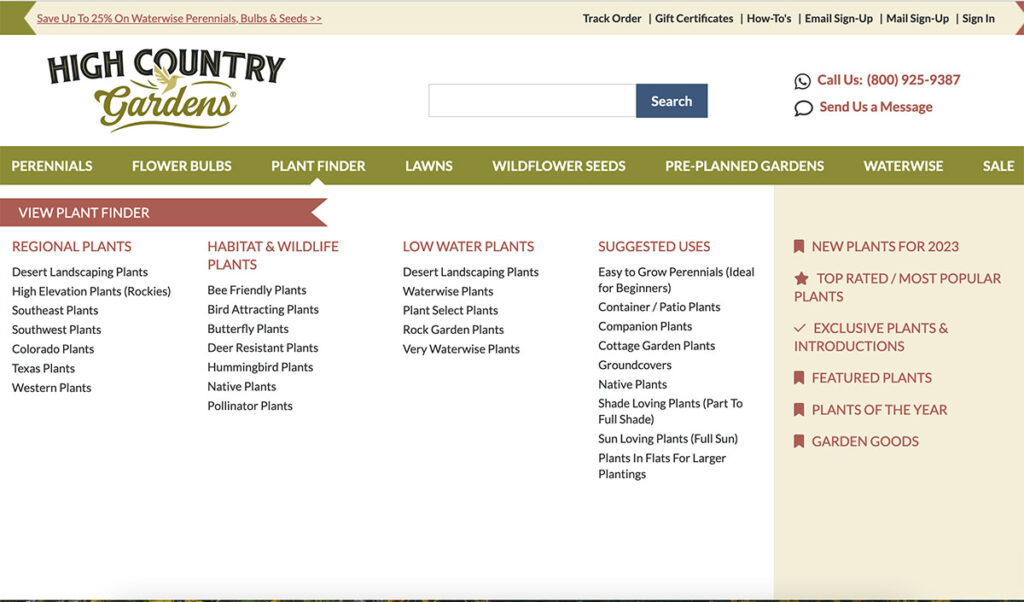
HighCountryGardens.com

Image credit: HighCountryGardens.com | Plant Finder page
High Country Gardens is an online retailer of sustainable and waterwise plants. Many of their plants are well suited for Colorado and the semi-arid West. They have a Plant Finder tool that can help you discover plants you like, including categories called “Colorado Plants,” “High Elevation Plants” and “Western Plants.”
When I visit their website, I often use their search bar at the top of their website. I use it to look up specific waterwise plants.
If you’re a visual person, their website has great plant photos.
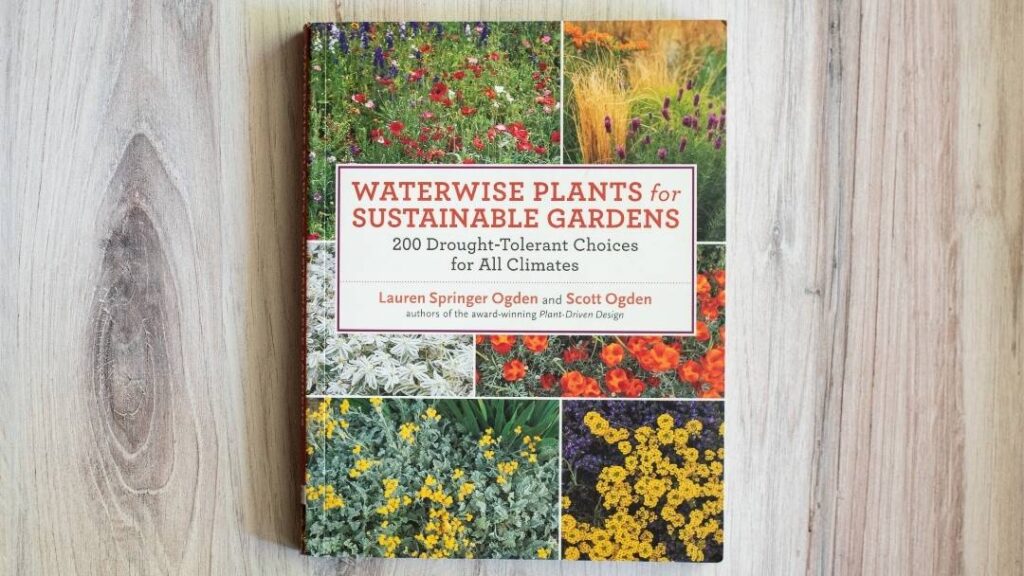
“Waterwise Plants for Sustainable Gardens” (Book)
This is one of my go-to books for waterwise plants in Colorado and the semi-arid West. It’s filled with photos and helpful tips that can be used whether you’re a beginner, intermediate or advanced gardener.
Pro tip: This book contains waterwise plants for different part of the West, including the West Coast. As you go through the book, make sure the flowers you like match your plant hardiness zone. A plant hardiness zone tells you whether a plant is likely to survive the coldest winter temperatures that are expected in your area. Some of the plants in the book are better suited for parts of the West with warmer winters.
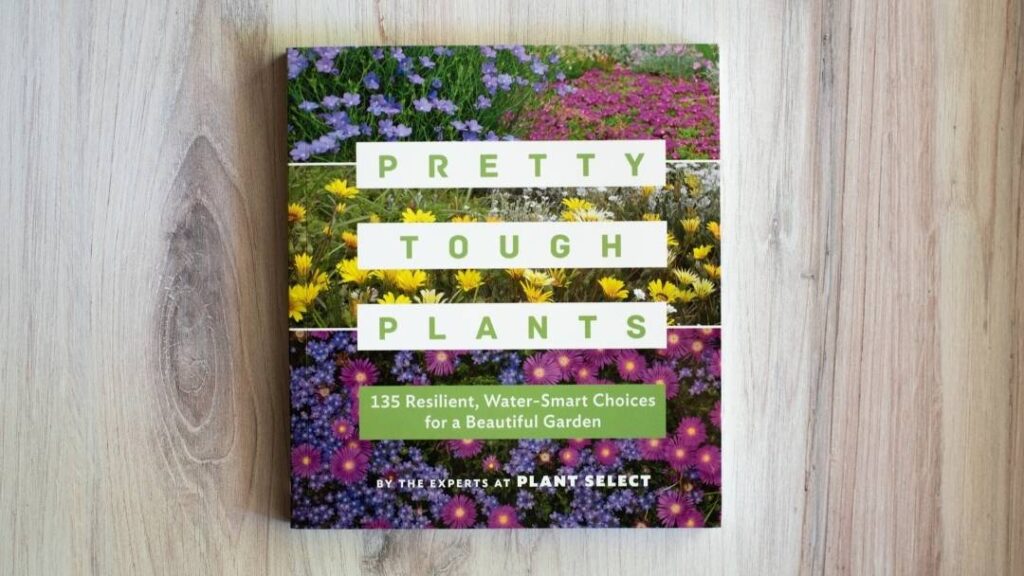
“Pretty Tough Plants” (Book)
In addition to having a website, Plant Select has a great book called “Pretty Tough Plants.” I refer to this book all the time. It’s another book that is user-friendly for gardeners of different levels. This book is no longer in print, so if you can find a copy on Amazon, snag it!
Native Plant Society Websites
Native plants are plants that have evolved naturally in a region. (The European settlers didn’t introduce them.) Native plants provide great habitats and food sources for birds, insects and wildlife. Many western native plants can tolerate drought and/or don’t need much water. (Though, not all!)
To find native plants for your state, here is a list of native plant societies for the intermountain region. Many have plant databases on their websites:
I hope these websites and books help you learn about waterwise plants, so you can create big beauty for less effort. And cheers to using less water!
Related tips that may interest you:
by Ann at Go West Gardener | Updated: Sep 12, 2025 | Gardening Tips and Tricks, In-ground garden, Waterwise Gardening in the Intermountain West, Western Container Gardening With Flowers
Many years ago, I cheered on a friend as he ran a local marathon. As my friend began running, he looked like he belonged in a Nike ad: Strong. Healthy. Determined. Just do it, baby!
And he set a great pace until about mile 16 …
… when heat and exhaustion caught him like a cat chasing a mouse. Life decisions were questioned. (Was a burrito really the best decision for breakfast?) He was doing the best he could, but he was digging deep.
I find myself thinking about mile 16 as we slog through heat waves in our western gardens.
Temps are blazing. Weeds are thriving. Critters, like Japanese beetles, are munching. And munching. And munching.
It can feel a little exhausting. Garden decisions are questioned: Was it really the best idea to impulse-buy flowers in the last 2 weeks? (Asking for a friend. Ahem.)
Heat waves are an ideal time to talk about how to garden smarter, not harder.
If you find yourself gardening in the heat, here are 5 ways to keep the beauty coming with less effort.
1) Make sure your flower garden has 1-2″ of mulch.
Mulch is your friend when you’re gardening in the heat. It keeps your plants’ roots cooler. (Happier plants!) It keeps your plants hydrated. (Less watering!) It helps suppress weeds. (Less work!)
If you aren’t familiar with mulch, it’s a material you put on top of the ground—like small wood chips or “squeegee,” which is a smaller form of pea gravel.
You can even put mulch in a flowerpot if you want.
I use a few different materials for mulch, depending on the plants. Some of my gardens have mini-bark (small wood chips). Some have “soil pep” (a very fine wood mulch). I like these smaller wood mulches because they break down more easily than big, chunky wood mulch, adding organic material to my garden beds. They’re less likely to soak up water like big, chunky wood mulch. I also think they look better, but that’s just personal preference.
In my more xeric gardens (the low-water gardens), I use squeegee as a mulch. It drains well, and it doesn’t add organic material to the ground. Many low-water plants like “leaner” soil, meaning it isn’t rich in organic material.
2) Snap a few pics of your flowers on your phone.
Take note of which flowers look like champs in the heat, which plants are limping along, and which flowers are guzzling water like a 6-year-old chugging juice boxes.
At some point, you may wish to replace the strugglers and water guzzlers with flowers that thrive in our western heat and drought. That way, you can spend your time sipping chilled beverages and dazzling your friends with how fab your garden looks.
You can find western flower ideas here.
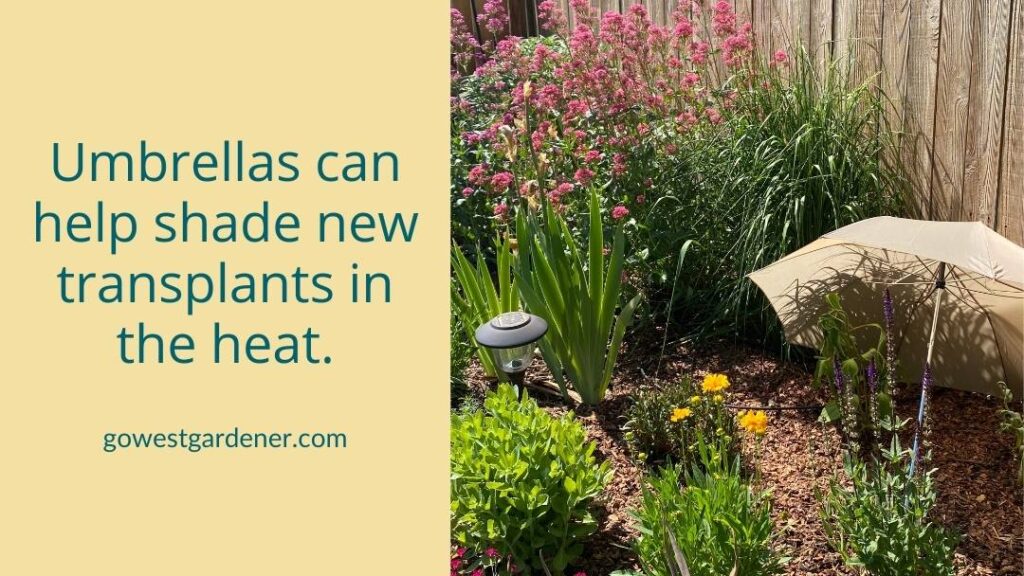
3) Focus your energy on newly planted flowers.
Have you popped any plants in the ground or in your flowerpots in the last 4 weeks? Those plant babies need more attention in the heat. Heck, even low-water plants need frequent watering their first season, so they can establish healthy roots.
For your in-ground plants, I’ve found that rain umbrellas make wonderful sun shields for new plants in extreme heat. Just make sure it isn’t windy. (Learned that one the hard way!)
You also can prop up shade cloth, which you can find at garden supply companies.
Another tip… Plant small, landscape flags next to your new plants during their first month. That way, you’re less likely to overlook them or forget to water them, especially if they’re tucked in among bigger plants.
When temps are blazing in months like July, it’s a good idea to check newly planted flowers every day (for the first 4 weeks or so) to see if they need water.
And consider trimming off the flower blooms on your newly planted perennials (the plants that come back every year). Snip, snip!
You may be thinking, “Wait, whaaaaat??”
I know that sounds a little crazy. You probably bought the plant BECAUSE OF the pretty blooms. But cutting off the flowers can allow your new plants to focus their energy on establishing good root systems in the heat.
4) Be smart with your flowerpots.
If possible, give your flowerpots a good soak in the morning by 10 am. Watering in the morning reduces evaporation, and it helps keep your flowers hydrated through the day.
Some flowers in your pots may wilt from heat, rather than just from lack of water. (I’m looking at you, Sweet Potato Vine.) Before you water, make sure the soil (dirt) in your flowerpots actually needs water, so you don’t overwater your flowers by accident.
You may want to move any flowerpots that are struggling in the heat to a shadier spot for a few days, if you can.
5) Find efficient ways to water your garden.
For example, check out drip irrigation. Drip lines are thin, little hoses that run near your plants’ roots. Drip systems are 90% efficient, compared to sprinkler systems which are only 50%-70% efficient, says the Colorado State University Extension.
Do you have clay soil—dense, sticky dirt that’s common in many parts of the intermountain west?
If yes, it helps to get in the habit of watering your established plants deeply and infrequently, instead of giving them quick, daily splashes of water. This encourages your plants to grow deeper roots, so their roots can find water in the ground. (Read: Less work for you.) Use your best judgment, of course. If your plants need water, then water them.
Stay strong! Stay cool! You’ve got this!
Related tips that may interest you:
by Ann at Go West Gardener | Updated: Jun 20, 2025 | Gardening Tips and Tricks
What the heck is turning your plants into lace-y skeletons?
If it’s late June, July or August in the Front Range of Colorado, Japanese beetles may be to blame.
“What do Japanese beetles look like?” you may be wondering.
Japanese beetles are metallic green insects with dark orange wings, making their backs look metallic orange. They have white spots along their sides.
And they will eat their way through your yard with reckless abandon.

Japanese beetles are spreading along the Front Range of Colorado, including the metro Denver area, parts of Pueblo, Boulder and Ft. Collins.
So, what can you do about Japanese beetles?
It’s 100% normal to go out and buy the first products you see to get rid of Japanese beetles.
But, while these products may be well intentioned, many have not proven to be effective in reducing damage on your plants. You may be throwing away good money.
And some products are very toxic to the good insects in your garden, like bees. You may be unintentionally nuking your own garden.
In this video about Japanese beetles, you’ll get:
- A basic introduction to Japanese beetles, so you know what to expect
- 2 primary ways to think about Japanese beetle control, so you use your time well
- A look at some of the plants they REALLY like
- Myths about ways to get rid of Japanese beetles, so you don’t waste your money on products that don’t work
- A more detailed resource, if you want it, that includes Japanese beetle control products on the market
Prefer to read?
Scroll down for the transcript.
I’ve also included helpful resources at the end of this article, including different products you can use to control the beetles.
Transcript of Japanese beetle video:
Japanese beetles in Colorado.
They’re working their way up and down the Front Range.
These beetles can be a royal pain in the bootie for your flowerpots, your garden, your trees and even your lawn.
So, in this video, you’re going to find out what you should know about Japanese beetles in Colorado and how to control them.
[music]
Hi, I’m Ann with Go West Gardener.
Inspiring new western gardeners to find their green thumbs with flowers.
Real quick, in addition to my 15 years of hands-on experience with gardening in Colorado, I’ve completed more than 120 hours of formal training in western gardening, and I continue to take courses and workshops, so I can help you with topics like the one today: Japanese beetles in Colorado.
Unfortunately, Japanese beetles are here to stay along the Front Range. So, it’s helpful to plan ahead and know what your options are.
In this video, I want to give you:
- A basic introduction to Japanese beetles because there’s A LOT of misinformation out there.
- I’m going to share 2 primary ways to think about Japanese beetle control.
- I’m going to debunk some myths about ways to get rid of Japanese beetles. (And yes, you will see your neighbors doing these things.)
- And I’m going to point you to a more detailed resource, if you want it.
Let’s jump in.
Japanese beetles go through a one-year life cycle, but if you have a yard you care about, the real “joy” with beetles comes in the second half of the summer in Colorado.
Around the very end of June or early in July, the adult beetles will emerge from your lawn and start showing up on your plants.
And now they’re ready to eat their way through your garden in July, August and sometimes early September.
Japanese beetles have two priorities:
- To eat and
- To reproduce
If you had them last year, you know they will chew their way through your plants, creating holes in your plants and turning them into lacey skeletons.
Depending on the plant, they may eat the flower petals, they may eat the leaves, or they may eat both.
And between their dinner parties on your plants, the females will fly down to your lawn, dig a few inches down to lay eggs, and then come back up and start the process all over again.
So now, you don’t just have the adult beetles to think about, you have their babies too.
As the eggs hatch, the larvae — which are these little white grubs — will feed on the roots of the grass in your lawn.
And they’re especially fond of lawns that we have along the Front Range of Colorado, like Kentucky bluegrass, fescue and ryegrass lawns.
So, picture this…
You’ve got the adult beetles chewing on your plants above ground, and you’ve got their babies — these little white grubs — chewing on the roots of your lawn.
Not a good time!
As temperatures drop, the grubs will dig deeper into your soil for the winter and then come up closer to the surface again in the spring before they emerge as adult beetles in late June and early July.
So, if we’re going to talk about how to control Japanese beetles in Colorado, it helps to think of them as affecting your yard in two ways:
- You’ve got the adults eating your plants, and
- You’ve got the grubs chewing on the roots of your lawn
From a control and treatment perspective, you can deal with the adults, and you can deal with the grubs.
Let’s talk about how to control the adults that are eating your plants.
One of the biggest things you can do to PREVENT damage is avoid planting flowers and trees that Japanese beetles love in Colorado.
These are plants like roses, Virginia creeper (it’s a vine you’ll see growing along fences), linden trees and some types of fruit trees.
I had a plum tree that the beetles would just fall out of and land in your hair, like the tree was dripping with insects.
It was so gross.
And that’s just the start of what they like to eat.
Every year I feel like I find them on something new.
But let’s say you absolutely love a plant, like roses, and you want to plant them.
Then just know that your roses will look great early in the summer, the beetles will try to chew them up in the middle of the summer, and then, it’s possible your roses may give you flowers again in the early fall after the adult beetles have died.
Now, you may be thinking, so prevention is great, Ann, but I have beetles NOW.
“What can I do about them?”
“How do I get rid of them?”
“Can’t I just spray them?”
Yes, there are insecticides and some bio-controls you can use to kill Japanese beetles.
But do your research because many of these also have a negative effect on bees and other pollinators — the really good insects in your garden that we need.
Later in this video, I’m going to share a resource where you can find a list of product options for you on what you can apply to your plants, including how toxic they are.
If you DO have beetles and you DON’T want to use poisons, one of the most effective things you can do is to put on a pair of garden gloves, put together a container of soapy water, and then knock or pick and drop the beetles into the soapy water to drown them.
(This works with small amounts of beetles.)
Dig through your recycling bin to find a container you can use.
I will often save an empty, plastic butter container that I fill up with soapy water.
I plop the beetles in and then put the top on until I know they’re dead.
Once the beetles are dead, you can throw them out in your trash, you can compost them, you can even bury them — they won’t cause any harm at that point.
When the beetles are chewing on your plants, your plants are releasing a compound that’s like a magnet to more beetles.
For me, this always makes me think of the local ice cream truck.
On summer nights, it comes cruising through our neighborhood, playing that distinctive musical jingle, and the kids come running to it.
So, your plants are basically doing the same thing as that ice cream truck playing that song, and the beetles don’t want to miss it.
Here’s what this means.
It’s better to get the beetles early before you have a feeding frenzy on your hands.
If your plants haven’t been damaged too much yet, it’s like the ice cream song is really quiet. But if you wait until your plants have a lot of damage — the music will be blaring and more beetles will come.
Beetles are groggiest at cooler times of the day and when it’s darker, like in the evening or early in the morning, so those are the best times to try to pick them off your plants.
If you try catching them during the day when it’s warm, they’ll quickly fly away. I have to say, this doesn’t stop me from trying to catch them, but I often miss many of them.
Okay, so that’s one option.
You can pick off the beetles by hand.
But let’s say you have A LOT of beetles, like on your roses or on your vines.
I recently took a Colorado gardening course where the speaker was talking about using a shop vac to vacuum up the beetles from the vine that the beetles were eating.
I have not tried this, but it sounds interesting if you have too many beetles to pick off.
And you know what I’m talking about when you have 5 beetles the first day, and then 20 the next day, and then 172 the next day.
The beetle party can get out of control quickly!
You’ll still need to kill the beetles when they end up in your shop vac, and you’ll need to find a way to keep them from clogging up your filter.
But I’m passing this idea long in case it inspires you.
If you see beetles on the ground, you can squish them.
A few years ago, there was some question about whether this would attract more beetles to your home, but that’s no longer considered to be an issue.
What the beetles are attracted to is your plants because they’re playing that ice cream truck song.
If you happen to have chickens, you can let your feathered friends help you with pest control.
And the last thing I’m going to mention is that one of our state universities and one of our state agencies are running tests on ways to control the beetles, including releasing other insects that will attack the beetles.
So, fingers crossed we’ll have more options in the future.
Okay, so let’s pause for a moment and talk about one thing that has NOT proven to be as effective for protecting your plants.
You may see your neighbors hanging up bags to catch the beetles — Japanese beetle traps.
And I get it, it’s an appealing solution.
Here’s the thing.
These bags will definitely catch beetles, and they’re great if you’re part of research project on how many beetles are present in your area.
However, they have not shown to lower damage to the plants in your yard.
In fact, you could actually end up increasing the damage.
The reason is these bags are a magnet for beetles to your yard, and the bags don’t catch every beetle.
So you’re basically ringing a dinner bell for the beetles to come home.
Save your money and skip the bag.
Also, you may go on the Internet and read about remedies with different types of oils, including neem oil and garlic.
My understanding is, in the trials that have been done with Japanese beetles in Colorado, these remedies have not shown to be effective.
Okay, so we’ve talked about the big controls you can use for the beetles eating your plants.
But remember, you’ve got the adult beetles on your plants, and their babies are eating your lawn.
Let’s change gears and talk about how you can protect your lawn.
But first, I want to make sure I’m clear.
When you are protecting your lawn, you are NOT going to prevent Japanese beetles from showing up on your plants.
The beetles can fly, and you will still end up with beetles from all your neighbors’ lawns.
The point of treating your lawn is to keep your grass alive.
What happens is the grubs eat the roots of your grass, particularly in August and September, so your grass has trouble absorbing the water it needs to stay alive.
And here in Colorado, this is the time of the year when our grass is already kind of stressed out from the heat, right?
You also may end up with critters, like raccoons, digging holes in your grass trying to get the grubs.
So, here are some options for protecting your lawn.
If you are moving into a new home and you have a choice of grass, the beetles are less crazy about some “warm season” grasses, like Bermuda, Blue Grama and Dog Tuff grass.
So, you may want to do some research on what it’s like to have a warm season grass lawn.
Or, you may want to skip a grass lawn all together.
If you have a traditional lawn, like Kentucky bluegrass, you can keep your grass healthier starting in the spring.
This makes it more resistant to beetle damage.
This means mowing your grass at a longer length (not short like a putting green).
Longer grass means you have longer roots. Shorter grass means shorter roots, and shorter roots are vulnerable.
It helps to fertilize your lawn, so it gets the nutrients it needs.
It helps to “aerate” your lawn — that’s when the dirt plugs are taken out of your grass — so air and water can get down to the roots.
And it helps to give your lawn a deep, soaking water and then no water for the next few days, rather than watering for a short amount of time every day.
All of these steps will keep your roots happier.
And the healthier your grass is going into July, August and September when those grubs are chomping away, the more your lawn will be able to handle the damage from grubs.
Here’s another thing.
Female beetles like damp yards to lay their eggs, so if your lawn is healthy and you can minimize your watering in July and August, you will deter the beetles from laying their eggs in your yard.
This also helps because the beetle eggs and those baby grubs will often die if they dry out.
In case you’re wondering, there ARE some insecticides and bio-controls you can put down.
I will share a resource with you shortly, so you can see your options.
But again, do your research because some have minimal effects on bees, pets and humans, and others are more toxic.
Oh, and there is one treatment worth mentioning that was popular for a few years, but it hasn’t proven to be all that successful in killing the grubs.
It’s called milky spore — it’s a biological control you apply to your lawn.
It’s shown to have a really LOW effective rate for controlling Japanese beetles, so again, you may want to save your money and skip that one.
And if you want to learn more about this, you can read about it in the helpful resource I’ve promised you.
The Colorado State University Extension has created an up-to-date fact sheet on Japanese beetles.
[Note: You’ll find more resources below too.]
The fact sheet is based on research about Japanese beetles, and it includes a list of specific products to help control the beetles.
I will share upfront, the fact sheet can get a little technical, but it’s still helpful.
So, if you’re interested, check it out.
And if you’d love to feel more confident with flower gardening in Colorado, please click subscribe below [on YouTube].
Go get those beetles, and I’ll see you next time.
[music]
More Japanese Beetle resources to help you
by Ann at Go West Gardener | Updated: Apr 24, 2025 | Flower Garden Basics, Western Container Gardening With Flowers
So, you’re dashing into Costco, and what grabs your eye?
Colorful, happy flowers just waiting for you to give them a new home, like a litter of fluffy puppies. Eeek!
You can’t help but walk over and take a closer look. After a long, drab winter, the flowers look so colorful and ALIVE.
But …
Is now even a good time to buy and plant flowers for your summer garden??
When IS a good time?
Those cute, lil’ flowers continue to stare up at you with their puppy dog eyes, and your doubts melt away.
You think, “Screw it, I’m buying them. Who cares about timing anyway?”
So, about that…
If you buy your summer flowers too early, you’ll have to protect your plant babies. Many of them don’t like frosts, snow or chilly temps.
If you don’t protect them, they can struggle and may even die.
(Not exactly the summer vibe you’re going for, right?)
In this tip, you’ll get the scoop on 3 misconceptions about when to buy and plant summer flowers.
You’ll discover how to:
- Be a smarter shopper
- Create less work for yourself
- Get your flower season off to an awesome start (yesss!)
To keep things simple, I’m going to focus on “annuals.”
Annuals are the extroverts at the party.
They’re the showy flowers you often see for sale as you dash into the grocery store. Annuals give you pretty color for one growing season, but then they’re done. They’re popular flowers for flowerpots. You can plant them in the ground too.
Misconception 1:
As soon as you start seeing colorful flowers at the store, you’re in the clear to plant them.
Imagine, for a moment, that you have friends visiting from San Diego.
It’s 50 degrees outside. You’re debating whether to wear shorts… and your friends want to put on parkas.
Many of your summer flowers are like your warm-blooded friends.
These flowers don’t like frosts AT ALL.
And many struggle in chilly temps. They want it to be at least 50 degrees outside — including temperatures at night. There’s a saying that these flowers like to have “warm feet.” They need warm soil to grow.
Yep, these tender flowers like sandals weather. Frosts, chilly temps and cold soils can stunt your flowers, so your flowers don’t grow. (It’s like the poor lil’ dudes are in shock!) Or worse, your new flowers may die.
Instead of using when you see flowers at the store as your signal to start planting, it’s more helpful to consider:
- When are your chances for frost really low?
- When are your temperatures consistently above 50 degrees?
If you buy your summer flowers early, it’s okay! But hold off on planting them. And be ready to protect your flowers from the cold for a while. (Translation: You’ll have a bit more work.)
Misconception 2:
The flowers in your summer pots can grow as long as temperatures are 32 degrees or warmer.
Let me start out by saying, there are some flowers that don’t mind cooler temperatures. Pansies are an awesome example. These cold-hardy flowers are like your relatives from Minnesota. A lil’ cold doesn’t phase them!
If you live someplace with hot summers, these flowers can be awesome for your spring and fall flowerpots because they can handle chilly temps and light frosts — and they don’t like heat.
And if you live someplace with cooler summers and chances for frosts (like in mountain towns), these flowers can be a great choice.
But as I mentioned in Misconception #1, your summer flowers are usually happier with warm air and warm soil.
If you aren’t sure whether a flower prefers warm or cool temperatures, I’d err on the side of caution.
For your summer flowers, 50 degrees can be a more helpful guideline than 32 degrees.
Are you working on your garden lingo? “Tender annuals” are your flowers that prefer warm air and warm soil to grow. “Half-hardy annuals” are usually okay in cooler temps, but typically not frost. “Hardy annuals” are very resistant to chilly temps and can usually tolerate a little frost. They don’t like hot weather.
Misconception 3:
Mother’s Day is the perfect day to buy and plant flowers.
You’ll hear this one A LOT.
I heard it where I grew up in the Midwest, and I hear it where I live in Colorado.
Mother’s Day is the day the squirrels come dancing out of trees, and a chorus of robins starts singing, and gardeners emerge from hibernation like hungry bears. 🙂 I get it. It’s hard to resist planting when we’ve all been cooped up for so long!!
I’m sure there are some places where Mother’s Day works as a reliable planting date. And there may be years when Mother’s Day works where you live too.
But there are a few tricky things about using Mother’s Day as a gardening guideline:
- One, the date for Mother’s Day changes every year, from early-May to mid-May.
- Two, it really depends on your weather, which can be unpredictable in the Intermountain West. In recent years in Colorado, for example, we’ve been getting chilly blasts later and later in the spring. Denver has gotten snow on or after Mother’s Day in 7 of the last 14 years!!
You may be thinking, “But, Ann, I heard Mother’s Day at the store.”
Yep, that happens.
Keep in mind that stores have a pony in the race. If you get flowers on Mother’s Day, those flowers happen to die and you have to buy new flowers, they come out ahead.
The bottom line?
While it depends on where you live, Mother’s Day is often a touch early for planting summer flowers in many parts of the Intermountain West — including much of the Front Range of Colorado.
Rather than using Mother’s Day as your planting guide, it’s more helpful to plant your summer flowers when:
- Your chances for frost are really low
- Your temperatures are consistently above 50 degrees
For example, in the Front Range of Colorado, this is often late May.
Can you buy your summer flowers by Mother’s Day?
Absolutely!
Just keep in mind that you’ll need to protect your plant babies if we get chilly temps, frosts, freezes or snow.
It’s going to take a little more effort.
Related topics that may interest you:

by Ann at Go West Gardener | Updated: Sep 12, 2025 | Gardening Tips and Tricks, Western Container Gardening With Flowers
I used to leave everything in my flowerpots until spring. The whole shebang. Dead flowers, old potting soil, all of it. And for a few years, everything was fine.
But then, I lost a few flowerpots to cracking. (Ugh.) I also learned about some pesky insects that like to overwinter in potting soil.
Now I’m on Team Fall.
There is no right or wrong approach here, so if you prefer to wait until spring, it’s okay! But here are 5 reasons to consider emptying your flowerpots in the fall.
#1: Fall is a good time to get rid of your old potting soil (dirt).
In the fall, I’ve found there are more ways to get rid of old potting soil, like local leaf and composting drop-offs. Not every one of them takes old potting soil, but some of them do. It’s one less thing to worry about later.
#2: You take insects out of the equation.
There are pesty insects—like leaf miners and budworms—that will overwinter as “pupae” (little cocoons) in soil. And your container of potting soil can be a great place to call home. Emptying your flowerpots in the fall helps take insects out of the equation, so you’re less likely to have issues next year.
#3: You can protect your flowerpots from breaking over the winter.
Some flowerpots are vulnerable to cracking and breaking over the winter—like clay, ceramic and resin pots.
Here are examples of winter freeze damage on several neighbors’ flowerpots. Do you see how parts of the flowerpots have cracked and fallen off?
Some pots can absorb moisture directly into their surfaces. When that moisture freezes, it can crack or damage your pots. I suspect this is what happened in the photos above.
In other cases, moisture can get into the old potting soil that’s in your pots. When the soil freezes, it can expand and break your pots—including your resin (plastic) pots.
I’ve learned this lesson the hard way.
And we get A LOT of freeze/thaws in the West!
When you empty your flowerpots in the fall, you remove the potential of old potting soil freezing, expanding and breaking your pots. Plus, you can move your flowerpots (that aren’t too heavy) to a garage or a covered porch, so they’re protected from moisture. That way, they last longer.
#4: You can remove the salt build-up on your pots while it’s still relatively fresh.
Cleaning your flowerpots is like cleaning up after a dinner party. Most of us don’t ENJOY scrubbing the lasagna dish or the mashed potato pan, but it’s a heck of a lot easier to get the residue off while it’s still fresh.
The same is true with your flowerpots.
We have hard water in many parts of the West, including Colorado. It can leave deposits of different types of salts (calcium, magnesium and iron) on the inside of your flowerpots. The build-up looks like a white, crusty material. It’s similar to the crusty material that can appear on kitchen and bathroom faucets.
And some types of popular flower fertilizers are based in salts. These salts can build up inside your pots too.
Do you see the salt build-up in the below? One of my neighbors hadn’t cleaned her flowerpots before. She was struggling to keep her flowers looking good. (Her flowerpots also didn’t have holes.)
At some point, all this salt build-up in your pots and soil can affect your flowers, especially after it builds up over a few years. It can become toxic to your plants.
Not to mention, salt attracts H2O molecules. It can pull water out of your plant’s roots.
I’ve found that this salt residue is easier to remove in the fall when it’s still fresh. It can become more of a chore to remove after time has passed, especially if you don’t do it every year.
#5: You have one less thing to do in the spring!
I know, I know, this means you have one MORE thing to do in the fall. But hey, it can be nice to get it done. That way, you can focus on cleaning up your garden in the spring or doing more of the fun flowerpot stuff, like planting.
Related tips that may interest you:
by Ann at Go West Gardener | Updated: Sep 12, 2025 | Gardening Tips and Tricks, In-ground garden
What NOT to Plant in Fall Gardens
Early fall can be a good time to plant perennials in many places in the intermountain West. (Perennials are your flowers that return year after year.)
But as I’ve learned the hard way in my Colorado garden…
There are some flowers you may not want to plant in the fall in Colorado, Wyoming and similar western states.
Some plants need a little more time for their roots to get established before winter.
Here are a few examples.
Avoid planting “marginally hardy perennials” in the fall.
What’s a marginally hardy perennial?
It’s a plant that won’t come back if it gets too cold or if it can’t handle winter conditions where you live.
Usually, these plants are better off when they’re planted in the late spring or early summer. That way, their roots have ALL summer to get established in the ground.
This gives them a better chance of surviving their first winter.
Here’s a simple trick to tell if a perennial is marginally cold hardy >>
The pink flower pictured above is known as Gaura or Wandflower (Gaura lindheimeri). I LOVE this flower plant, but it’s marginally hardy in my garden along the Front Range of Colorado.
Some years it comes back. Some years it doesn’t, and I have to replace it.
Because I know it’s marginally hardy in my garden, I wait until spring to plant it. I don’t plant it in the fall. That way, it has as much time as possible to get established before winter.
Native western salvias often do better with spring planting.
Native western salvias occur naturally in Texas, New Mexico and the Southwest. They go by botanical names like Salvia greggii and Salvia darcyi.
You may see popular ones at the garden center called Furman’s Red Sage and Wild Thing Sage.
Native western salvias thrive in hot and dry climates, so they grow well in our summers at our lower elevations.
These showy flowers are drought tolerant, long blooming and a favorite among hummingbirds.
So many reasons to love them!
But native salvias can be fickle in our winters.
It’s best to plant them in the spring or early summer (like May or June), rather than in the fall.
That way, their roots can get a running head start into autumn and winter.
In general, don’t plant evergreen trees in the fall. Spring is a better time.
While we’re on the subject of “what not to plant in the fall” in states like Colorado and Wyoming, add evergreen trees to your list too.
Evergreens (aka, “conifers”) are your trees that have needles. They don’t go dormant in the winter. This means they don’t go into hibernation mode like your trees that lose their leaves. They are awake and “ever green” through the winter.
Evergreen trees need to be well watered over the winter.
They’re also vulnerable to our tough winter conditions — like our drying winter winds and our big temperature swings — because they aren’t dormant.
It’s best to plant your evergreen trees in the spring, so their roots have more time to get established before winter.
Keep in mind, these are guidelines, rather than rules.
We may get a mild winter, and your plant babies may be fine.
But if you’d rather not risk it, then just wait until late spring to plant the flowers and trees in this article.
Related tips that may interest you:
by Ann at Go West Gardener | Updated: Oct 20, 2025 | Gardening Tips and Tricks, In-ground garden
It was a winter week to make a gardener shudder.
In February 2021, an arctic blast covered the western United States like a frosty ice pack from the kitchen freezer. Where I live in Colorado, the high temperature for several days was a not-so-balmy zero degrees. The nightly lows danced between -15 and -20 degrees below zero.
(It may have gotten even colder where you live!)
In the spring, many of my “marginally hardy” perennials did not come back.
Ugh.
Marginally hardy perennials are your “iffy” plants.
They could come back after winter. They should come back if your winter is mild. But if you get tough winter conditions or extreme colds, they’ll die.
So, if you want to know, “How can you tell if a perennial is marginally hardy?”, read on.
You’ll find a helpful way to tell if a perennial is marginally cold hardy.
Use this tip to choose plants that are more likely to handle our western weather and return to your garden!
First, a disclaimer…
(Don’t you love when people lead with disclaimers?)
There are MANY factors that can affect whether perennials will survive winter and return to your western garden in the spring — things like moisture, drought, wind, root health, micro-climates in your landscape, etc.
But to keep this simple…
We’re going to focus on winter temperatures.
Every plant has a threshold for how cold it can get over the winter and still survive.
If it gets too cold, it will die.
Your marginally hardy perennials won’t come back if it gets too cold for them over the winter.
And this is where plant hardiness zones come into play!
If you’re new to plant hardiness zones, don’t worry. I’ve included a brief explanation below. Or, you can learn about zones here, including how to find your garden’s zone.
Here’s a quick way to think about it.
When you buy plants, you’ll see zone numbers on their plant tags.
These numbers are a guide to how cold (or warm) it can get in the winter without killing the plant.
Zone numbers are kind of like a thermometer:
- Plants with lower zone numbers can survive colder winters.
- Plants with higher zone numbers can survive warmer winters.
The flower pictured above, Red Birds in a Tree, can survive very cold winter temperatures (in chilly zone 3), up through warm winter temperatures (in balmy zone 9).
Let’s say you live in plant hardiness zone 5 — like much of the Front Range of Colorado.
You find a flower plant you want to buy.
The plant tag says it grows in zones 5-9. (Remember, lower zone numbers mean the plant can handle colder winters.)
You live in zone 5, and the lowest zone that’s suggested for this plant is zone 5.
This perennial is marginally cold hardy where you live.
It’s right on the edge of being able to survive the coldest winter temperatures that are expected in your area.
If you get a winter with extreme lows, this plant may not make it, especially if it’s newly planted.
You may be more successful growing this perennial if you wait until the spring to plant it. That way, it has the entire summer to get established in your garden.
The same is true if you find a plant that grows well in zones 6-9.
Again, we’re looking at that first number.
This plant doesn’t like winters as cold as the ones that are possible in your area.
This plant is only marginally hardy where you live. If temperatures get too cold over winter, it won’t come back.
Still with me?
Let’s continue our example and talk about:
How to identify hardy perennials (aka, “cold hardy perennials”)
Again, let’s say your garden is in plant hardiness zone 5.
You find a flower plant that grows well in zones 4-8 or zones 3-9, like Red Birds in a Tree below.
This plant is a cold hardy perennial where you live.
It can survive colder winter temperatures than you normally get.
Related tips that may interest you:
by Ann at Go West Gardener | Updated: Sep 12, 2025 | Garden design Ideas, Gardening Tips and Tricks
You want your spring flowers to look pretty, but what’s the best way to design them?
How do you make the biggest impact?
Great questions!
In this week’s post, you’ll find 4 simple tips for spring bulb garden design. Use these tips when you plant your bulbs in the fall, so you can get a pretty look in the spring.
Plus, I’ve included a bonus tip on bulb planting… because gardening in the high-elevation West is an adventure, y’all!
For this article, let’s say you want to plant spring flowers in selective places in your yard.
For example, you want to plant them along a walkway or add pops of color through your garden.
We’ll assume you DON’T want to fill an entire garden bed with a mass planting of bulbs. (Your design approach will likely be different for a mass planting.)
I like to share upfront: Gardening is personal.
It’s your own form of artistic expression.
So, if you prefer to do something different than what I’m suggesting, do what makes you happy!
Okay, let’s jump into these tips on spring bulb garden design.
Design tip #1: You can create visual interest when you plant bulbs in small groups.
Translation: It looks really pretty!
For most plants, you dig a hole, and you place 1 plant in the hole.
But spring flowers can look lonely or out of place when you see a single flower only.
Instead, you can make a bigger impact with your spring flowers when you plant them in small clusters or groups.
And hey, we want some “wow” factor!
This means you’ll place a number of bulbs in a hole — rather than just 1 individual bulb per hole.
Design tip #2: Flowers look really good when they’re planted in odd numbers.
They look really good in sets of 3, 5, 7 or 9 plants.
This is known as the “rule of odds.”
Think of it as a helpful guideline, rather than a “you must do this” rule.
But it’s the same principle that’s used in many forms of art and design — from photography, to interior design.
Odd numbers create visual interest. They look good to our eye.
Why? Because:
- Odd numbers look natural.
- They feel more dynamic. (They aren’t too matchy-matchy to lose our interest.)
- They don’t compete for our attention, which can happen with even numbers.
- They give us repetition, but with variety.
So, what does this mean for your garden?
Spring flowers look great when you plant them:
- In an odd number of groupings
- With an odd number of flowers in each group
When you plant your bulbs, dig a wider hole. Place more than 1 bulb in the hole.
Here are common questions that come up about this:
- “What if I have an even number of bulbs?” If you’re buying a package of bulbs, you’ll often end up with an even number, like 12, 20 or 50 total bulbs. Do your best to achieve odd numbers where you can, but it’s 100% okay to plant an even number of bulbs in 1 or 2 holes.
- “What if I don’t have that many bulbs?” Try small groupings of 3 to 5 bulbs. They should still look good.
- “How far apart do you place the bulbs in the hole?” It varies by plant. Generally, you want to give the bulbs some space, rather than having them touching each other. With tulips, for example, you may want to space your bulbs 2″ to 5″ apart in the hole.
Design tip #3: Plant the same colors together for big pops of color.
Let’s say you’ve purchased several colors of spring flowers.
You can create vibrant pops of color when you group the same colors together.
This means you may want to plant 1 color per grouping.
For example, let’s pretend you bought bulbs for pink tulips and for white tulips:
- Group the pink tulips together.
- Put the white tulips in different clusters.
You can still plant the different clusters near each other for pretty variety!
And yes, there are times when mixing the bulbs together may make sense for you. For example:
- If you bought a bag of pre-mixed bulbs, those bulbs are likely designed to look great together. Mix away!
- If you’re doing a mass planting and filling an entire garden bed with bulbs, you may want to mix all the colors together. It depends on the look you’re going for.
Design tip #4: Consider planting your spring bulbs behind or among perennials.
Some spring flowers — like tulips — go through a not-so-pretty phase when they finish blooming. Their leaves get floppy and turn yellow.
It’s important to resist the urge to cut off those floppy, yellow leaves.
And this is where spring bulb design comes in handy!
Plant your bulbs behind or next to perennials. Perennials are the flower plants that return year after year.
When your perennials begin to grow in the spring, their foliage can help mask the fading leaves on your spring bulbs.
BONUS tip: Be careful planting bulbs in hot spots in your garden.
We’re gardening at elevation in Colorado, Utah and the intermountain west. This means that the sun is very intense on our flower plants — especially in certain parts of our yards.
Let’s say you want to plant your spring flowers along a sunny, south-facing or west-facing structure (like a wall, fence or building).
The temperatures can get hotter here than other parts of your yard.
In garden lingo, this is known as a “heat sink.”
Think of it like a little micro-climate in your yard.
Sometimes, this can create tough conditions for your flowers.
So, what does this have to do with your bulbs?
When you plant your bulbs in these hot spots, your bulbs may think it’s time to get the party started earlier in the spring.
The ground may warm up faster.
Your flowers may want to emerge too early.
They become vulnerable to freeze damage.
If your flowers are getting ready to bloom and the temperatures plummet for a few days, it can nip your flowers’ buds for that year.
Some years, you may not have an issue.
But other years?
You may need to babysit your plants.
I had purple allium planted along a sunny, south-facing fence.
We had a bad year of freeze damage. The allium had brown leaves and shriveled up buds. I realized I should have taken extra steps to protect them.
You’ll have less work if you avoid planting bulbs in these hot spots.
Related tips that may interest you: